Wednesday, December 6, 2017

Aerohive Devices and CAPWAP Connection Issues w/ Barracuda Firewall

If you have a Barracuda Firewall, Aerohive devices managed by HiveManager Online, and find that your devices running newer versions of HiveOS can't maintain a CAPWAP Connection:


  • Create a service object on the firewall with the following parameters:

  • Create a rule like this one:

    And it should solve your issue.
  • Wednesday, November 29, 2017

    Thoughts on the "Coding Craze"

    Recently, a huge amount of emphasis has been placed on exposing kids to programming.  Bill Gates and others have had a lot of influence toward this, and many tools are now available to assist teachers with bringing coding into their classroom.  It's a very good thing, as it draws attention to a STEM-related career path.  However, there are dozens of pathways one could take in an IT/tech based career and coding is only one option.

    I do not know any programming languages.  What I once knew about C++ and Java I've long since forgotten.  To be frank, I don't like programming.  I find it boring and frustrating, and because I didn't enjoy it I never spent time trying to improve my skills.  That did not rule out an IT career for me.  My concern is that with such a strong emphasis placed on programming, the kids who don't find it is "their thing" will see that as the only option for a technical career and will write off anything else.

    My "thing" is networking and infrastructure.  I get excited about configuring a switch (saying you are "programming" a switch is a misnomer), setting up a new VLAN and designing an address scheme, or setting up a firewall rule.  I even enjoy the challenge of trying to get a wireless infrastructure to play nicely in a building that couldn't be less friendly to RF environments.  None of this is going away.  Even with the push to the cloud, you still need a solid infrastructure to access those remotely hosted resources.

    Some really enjoy the server side of things.  Those cloud resources you hear about--they're not magic, there are teams managing servers in massive data centers.  Take our student information system, for example.  It is cloud hosted, but the team in charge of that needs to maintain backups, perform updates as necessary, maintain the system for redundancy and high availability, even migrate to newer hardware when replacing aging servers.

    Another student may find they love web design or graphic design and wants to make a career out of that.  Maybe they want to be an engineer at Lenovo, Apple, or Cisco deciding which components to use and how to best design a new device for proper performance, longevity, serviceability, and usability.

    The possibilities are indeed nearly endless.  Unfortunately, while they may not get completely overlooked, very little attention is drawn to them.  While coding is one great option, it is not the be-all-end-all of careers in technology.

    Monday, November 13, 2017

    ChromeOS Native Printing (Integration with Windows Print Server)

    One of my few gripes with Chrome OS for years has been how printing is handled.  Up until recently, the only option was to use the cloud print service on your print server.  It was clunky, time consuming to setup, and prone to issues.  Upon troubleshooting issues with my current setup, I discovered that they released a better option which allows ChromeOS to natively communicate with a printer without requiring the cloud connector as a middleman.

    So, here's how to set it up on a print server running Server 2016:
    1. Install the LPD service on your print server.  You may already have this if you have Macs in your environment since it would be used for printing from Unix-based operating systems.  We do not, so I had to install it.  It's quick, and there is no additional configuration necessary.  Just add it like you would any other role or feature:

    2. In the Google Admin console, navigate to Device Management > Chrome > User Settings, then select an organization of users to deploy printers to.  Scroll down to "Native Chrome OS Printing":

    3. Click Manage, then "Add a Printer".  I used the following options to add a printer shared on my print server.  The IP address in the last section is the IP of my print server.  "/CBRSDITLaser" is the share name of the printer on that server.


    4. Save and you're done!  I have PaperCut's free print logger installed on my print server.  Originally, print logs from Chromebooks were useless because they would all show up as coming from the service account that I had setup for Chromebook printing.  Unfortunately, they're only slightly better.  They don't show a username, but they do show the device's IP address.  In my environment, I can narrow down the source of a job as long as too much time hasn't gone by since that IP will tie to the username in our web filter logs.


    Thursday, August 17, 2017

    Quick Notes: SSL LDAP & Hosted PowerSchool

    When I first setup PowerSchool to link with Active Directory, I set it up to use a non-SSL LDAP connection, which isn't exactly ideal.  Today I finally got around to fixing it, but some of the instructions from PowerSchool are vague (specifically what format it's looking for) and resulted in some trial and error on my part.

    I'm adding notes regarding what worked for me for anyone who needs to do this, or for myself when I replace the DC I used.

    You'll need to:

    • Get Active Directory to accept LDAPS Connections.  These two articles help with this if you don't know how to do it:
      • https://www.petri.com/enable-secure-ldap-windows-server-2008-2012-dc
      • https://www.petri.com/enable-secure-ldap-windows-server-2008-2012-dc-configuration
    • Dedicate an external static IP for your domain controller and setup an A record to point to it.  I used the internal FQDN for my A record, but there's a field in PowerSchool that may make this unnecessary.  I won't include instructions on this because it'll vary by ISP.
    • Setup a firewall rule to allow the PowerSchool server to communicate with your LDAP server.  Simply pinging the hostname of your hosted PowerSchool server won't give you the right IP--the complete list is available on PowerSource (Article 6687).
    • Create a service account in AD for PowerSchool to use to query Active Directory
    • Export the Certificate:
      • Launch MMC on the DC you are using.
      • Add the "Certificates" snapin and select "Computer" then "Local Computer"
      • Choose Personal > Certificates
      • Right-click the top level item in the left pane.  This should include the FQDN of your domain controller.  Click All Tasks > Export
      • Choose the Base-64 encoded X.509 format to export it.  I just named it with my domain controller's name.
    • Import the Certificate into PowerSchool:
      • Go to Setup System > System Settings > Digital Certificate Management
      • Select the User Trust Store tab and scroll to the bottom.
      • Choose your file, name it, and import it.
    • Setup LDAPS in PowerSchool:
      • Go to Setup System > LDAP Directory Setup
        • LDAP Server Hostname:  Use the hostname that you setup in DNS to point to the public static IP you used.
        • LDAP Port:  636
        • Enable SSL:  SSL Enabled (PowerSchool Keystore)
        • Active Directory FQDN:  FQDN of your DC.  I think the existence of this makes it so your LDAP server hostname doesn't necessarily need to match the FQDN, but I haven't tested to confirm.
        • LDAP Admin DN:  Service Account you are using to allow PowerSchool to query AD.
        • LDAP Admin Password:  Password for the above account.


    Monday, April 17, 2017

    Building Images with AutoDesk Software and Default Profiles

    AutoDesk offers their software to K-12 institutions and students and teachers at no cost.  Besides benefiting us by not having to pay for very expensive software, I think that's a fantastic move for them.  By doing that, they ensure students will learn their software rather than a competitor's and if/when they're in the field, that's what they'll buy.

    There's always a downside, though:  Their software relies on many components stored within the profile that installed it.  This is a problem for a few reasons:

    • Our lab PCs are setup to erase profiles that haven't been used in 24 hours.  This prevents them from building up and filling up the SSDs.  It also maintains some degree of consistency in the user experience.
    • When I build images, I use audit mode to setup the default profile. (If you're not doing this, I think you're building images incorrectly, but that's besides the point)  In the process of doing this, the AutoDesk software is installed.  Problem is, sysprep copies the admin profile over to default so when you launch the programs after you image, it's looking for files in the admin profile that don't exist.  Even if that weren't an issue, your users probably (hopefully) don't have rights to other user profiles.

    At one point I had written scripts to work around this that would move the files over and modify permissions.  They worked, but it's a clunky solution.  I found this solution after scouring the AutoDesk forums.

    As written, it almost works, except for the fact that MDT syspreps with the copy profile function at deployment time, so it's a little more labor intensive than indicated.  Here's how I got it to work:
    1. Image a PC/VM with your base image.  Presumably, you already have one and it's got a nice default profile setup.
    2. If it auto-joins, disjoin it from the domain.
    3. Run sysprep.exe /audit /reboot
    4. Install AutoDesk software and whatever else you need for your CAD image.  You'll need to prepare a deployment that points to your licensing server.  We use AutoCAD, Revit, and Inventor.  I also add Bridge Designer 2016 and SketchUp.  DO NOT run the AutoDesk software after you install it.
    5. Here's the part I don't like:  Because you're not able to do another copyprofile task, you will more than likely want to use desktop shortcuts in the public folder so they appear for everyone.  I don't like desktop shortcuts because they're inefficient when multi-tasking (ordinarily, I use the pin to start option), but it is what it is.
    6. Sysprep/Capture and deploy the image with CopyProfile set to false in your answer file.
    Following this process, I'm able to run the programs successfully with a user account that has very limited rights and can keep my user interface looking relatively consistent with the default profile from my base image.  Hopefully this helps someone else out!

    AutoCAD 2018 Education running after deployment showing some of my default profile customizations on Windows 10.

    Friday, March 31, 2017

    Making the Gmail Interface More User Friendly

    I think most of my posts will end up being geared toward the IT crowd, but this may have some useful information for the end user as well.

    Like many other public school districts, we eliminated our aging Exchange servers and moved our email accounts up to Google Apps a few years back.  From an education standpoint, this has many advantages:  zero cost, easy to manage, free archiving to comply with MA public records law, integration with collaboration tools for admins, teachers, and students, etc.

    At the same time, we abandoned Outlook for most of our users.  A few still use it, but I try to discourage it.  So as not to be a hypocrite when I discourage using Outlook, I did away with it myself.  As with almost anything in the world of technology, GMail isn't ideal in its default state.  Fortunately, I was able to adjust settings or enable "lab" features to get it how I wanted it to be.  You'll need to go to settings to do anything mentioned below (from your inbox choose settings from the gear icon near the top right side).  So, without further ado:

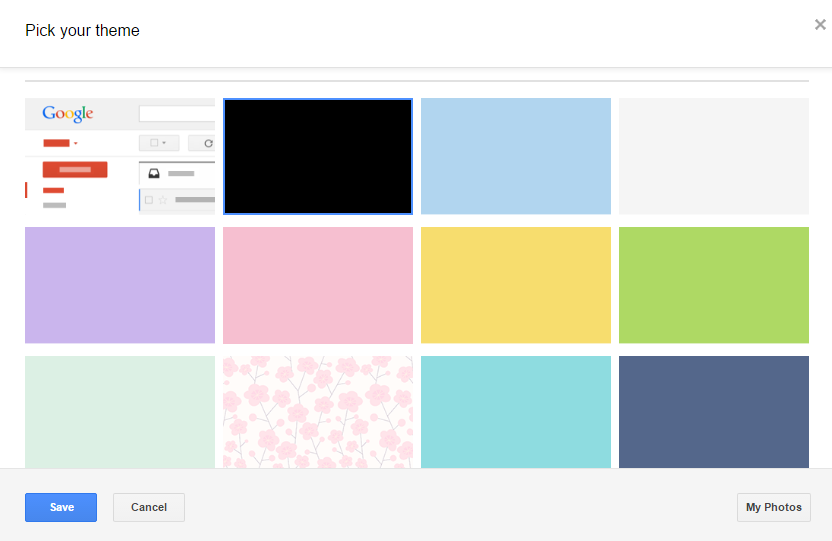
    Theme Change:  First thing's first, the default theme isn't great on the eyes.  I blame Apple for creating the trend of using an overwhelming amount of white (FYI, that'll likely be the first of many subtle jabs at Apple).  I don't like it because it's too bright to stare at all day.  There is a nice, dark theme though, and it's easy to change to it:

    From settings, go to the themes tab.  Click "set theme."  Pick a theme of your choosing.  I use the dark one second from the left in the top row, here:


    Preview Pane:  GMail doesn't have a preview pane enabled by default, but it's available as a lab feature:

    From settings, go to the labs tab, find "Preview Pane" and enable it.  While we're at it, enable the "mark as read" button.  With the preview pane enabled, the amount of time it takes for a message to show as read is a little more annoying:


    Speaking of time to mark messages as read, you can change this too.  Go to the general tab, and find this section.  Adjust accordingly:


    Other Stuff From Labs:  There's lots of stuff here, try some out!  I also use the calendar gadget, which puts upcoming events on the left of your inbox, and the unread message icon, which is just a nice touch:


    Undo Send:  Exchange allowed for recalling messages.  GMail does not, but I can't blame them.  Ten years ago, you had a good shot of someone not seeing a message quickly.  In the age of mobile computers that just so happen to have phone capabilities, though, that's much less likely.  You can, though, set a delay so that GMail won't send a message right away and you can "undo" it before it goes anywhere.  From the general tab in settings, just enable it and set a timeout:


    Inbox View Preferences:  These are a personal preference, but I'm including them in case others' minds think the same way mine does.  Google's conversation view confuses me--I like everything on its own line, and I don't like things grouped.  To change this, turn off conversation view from the general tab.  There is also an option to keep all unread messages at the top of your inbox.  From the inbox tab, you can change this:


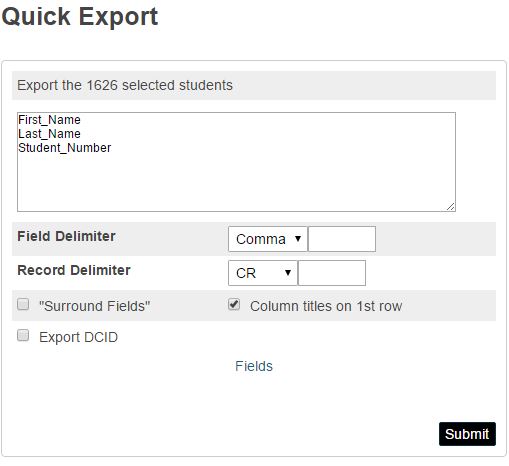
    Rules:  These are very useful.  For example, I'm a member of a state PowerSchool admins group.  It's a great resource, but sometimes the amount of messages that come through in a day is overwhelming.  I don't want them cluttering my inbox, but I want to see when there are unread messages from this group so I can look at them when I have time.  There's lots of documentation on setting rules up so I won't go into detail here, but this is what one of mine looks like:


    As for why I discourage using Outlook with Google Apps?

    • The best integration is accomplished with Google Apps sync, which is setup individually, not for all users across the board.  
    • Outlook can still save things locally if users don't make sure they are saving to a location that will sync up to their Google account.  Not so good if they are trying to find something on a mobile device or another PC, if their hard drive fails, etc.
    • When users change their password, it's not totally seamless.  Most ignore the prompt to re-authorize the sync agent.
    • It creates a bloated user profile because it downloads all mail/calendar/contact data.
    • Outlook's search function is very bad.
    • Some Outlook features no longer work because they're intended for Exchange (recall message, etc.)  Along the same lines, you can't take advantage of some GMail features with Outlook (delay send, for example).
    • Users don't get the same experience at home as they do on their school computer.
    • The big one:  Google hasn't released a new version of their app sync utility in over a year, so there's no telling when they will drop support or discontinue the product.

    Thursday, March 30, 2017

    How to Make PowerSchool Exports Default to CSV Format


    One of my qualms with PowerSchool is that it defaults to tab-delimited files with ".text" extensions for exports.  Natively, no programs are associated with ".text" files in Windows so users struggle to open them.  Also, most of the places that would require a manual import of data would want a .csv file anyway.  For our end users, .csv files just make more sense.

    Fortunately, changing the default can be accomplished by making a small customization to the export pages.  I've attached my "exportteachers.html" and "exportstudents.html" files in case you'd like to do the same.  These work with version 10.2.1.2 (and probably many other versions as well):

    exportteachers.html

    exportstudents.html

    Note:  When exporting student addresses, commas will split the address into two cells.  This happens if you have students with apartments.  We are a rural district so we have only a handful of students who live in apartments so it's quick to fix by hand.

    End result:


    Avoiding 5212 Errors in MDT Deployment

    We use Microsoft Deployment Toolkit to deploy all of our Windows-based computers.  With how well it works, I'm surprised there's still much of a market for third party imaging software.  That said, in an initial MDT setup there are a few things that don't work so well out of the box.

    When I was deploying images, the process would complete successfully but would throw a 5212 error at the end of the process:  FAILURE  ( 5212 ):  Welcome wizard failed or was cancelled.  Because it threw an error, it wouldn't skip the completion screen as my customsettings.ini file dictates.  That requires me to click "finish" on each PC, and I'd rather they complete the entire process on their own.

    It's relatively innocuous, but the fact that I'd have any error at all bothered me.  It's difficult to find much information on this, and much of it points to the wrong culprit (an IE setting in your answer file) but I was able to piece together the following:

    • It's caused by a leftover MININT folder in your WIM.
    • It apparently wasn't an issue prior to MDT 2013.
    • It doesn't cause problems with deployment, but did appear as an error at the end of the task sequence 100% of the time in my case.

    So, I assume that the Microsoft approved way would be to use DISM to mount the image, remove the folder, commit changes, and unmount.  I don't like that process because it takes longer than it needs to, but for the sake of completeness, I'll include it here:
    • Close MDT.
    • Create an empty folder somewhere to mount the WIM to (I used "C:\MountWIM")
    • From an elevated command prompt, run:
      Dism /Mount-Image
      /ImageFile:Capture.wim /index:1 /MountDir:C:\MountWIM
    • Go to the mount folder and delete the "MININT" folder from the root.  You can do this via command line or Windows Explorer.
    • From an elevated command prompt, run:
      Dism /Unmount-Image /MountDir:C:\MountWIM /commit

    Now, as mentioned that's more work than it needs to be.  The easier process is:
    • Close MDT.
    • Open the WIM file with 7-Zip.
    • Delete the "MININT" folder.
    • Close 7-Zip.

    At some point (time permitting), I may do a complete write-up on how I have MDT setup and how I capture/deploy images.  Many of the defaults aren't ideal.